Before you start your home energy retrofit project, get an EnerGuide home energy evaluation to understand how your home uses energy and identify all improvement opportunities. As always, check with your municipality, utility, or retailer to see if there are any rebates available.
Doors
In addition to typical provisions of security and control to an entryway, energy-efficient doors better prevent air and heat leaks into and out of the home. Doors come in a variety of materials and methods of construction, some of which resist heat flow better than others. For example, depending on the type of insulation, metal-clad doors can be more efficient than solid wooden doors. No matter what the material, ill-fitting doors can make your home drafty and uncomfortable.
What to Look For
- Doors made of materials with high insulating values, such as fibreglass, vinyl, or steel.
- Wood, vinyl, or thermally separated metal frame.
- Low air-leakage rates (for pre-hung door systems).
- Maintenance-free framing materials.
- A high energy efficiency rating or a minimum of double glazing with a 12 mm (half-inch) or greater air space for doors with glass.
Things to Consider
- Make sure that doors are ENERGY STAR® certified, and hire a professional installer to ensure they perform their best.
- Warranties differ from door supplier and type; compare before you purchase.
Cost : $400 – $2,000 per door.
Draftproofing
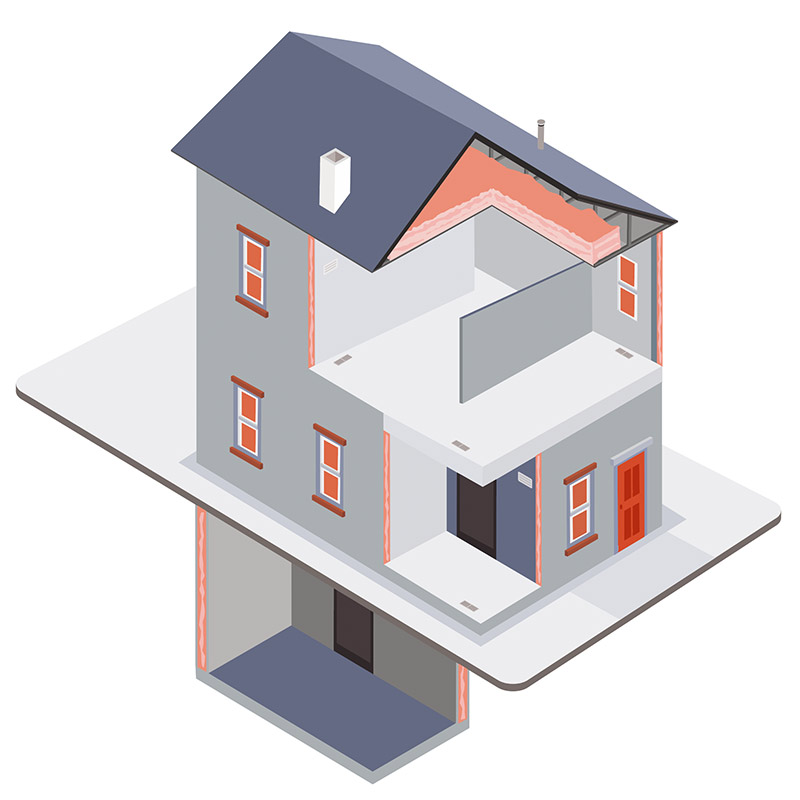
Draftproofing is one of the most affordable and easy ways to improve the energy efficiency of a home. It’s also the single most important step to improve the energy efficiency of your home and should always be one of the first steps of any retrofit project. You can save up to 30% of your energy costs by caulking cracks and plugging gaps on walls, inside and out.
Older homes typically have more air leaks which are typically found in and around window and door frames, electrical outlets, the upper ceiling, the foundation, and walls. You can seal air leaks in your home with weather-stripping and caulking or by applying gaskets and tapes.
What to Look For
- Detect all sources of air-leakage before you undertake your project; assess your ventilation needs to ensure adequate indoor air quality.
- Each house will respond to draftproofing in its own way, so monitoring is important. Older homes may require remedial measures—such as mould or asbestos removal—before comprehensive work to seal leaks.
- Every time you insulate or upgrade/install an air and moisture barrier system, it’s important to ensure that moisture does not enter the insulation or building envelope. A properly functioning building envelope will normally be able to dry out on either side of the moisture barrier, but excessive moisture may lead to mould and rot issues.
Types of draftproofing products include:
- Caulking, a putty-like substance best applied to non-moveable gaps like baseboards and wood trim
- Weather-stripping tapes and plastic forms
- Expandable spray foam which can be applied to irregularly shaped air gaps
- Shrink-wrap plastics which can be applied to the interior of windows
Things to Consider
- For detailed advice on draftproofing, which is also known as air-sealing, contact a professional contractor.
- Be sure to check window glazing, thresholds, door/window frames, and electrical outlets and switches as potential sources of air-leakage.
- Choose premium caulks for durability. Practice running and smoothing beads before you do the actual job.
- Check the size and colour of doors and windows before purchasing weather-stripping to ensure you buy the right product. Adhesive-backed foams and tapes can lose their effectiveness over time so you may need to replace them every few years.
Cost : $200 – $1,500
Attic Insulation
Air leaks, thermal bridging, and insulation gaps in your attic will result in substantial heat loss and lead to a variety of moisture-related problems in your home through physical phenomena like ‘the stack effect’ (also known as ‘the chimney effect’) and ‘the wind effect’. To maximize energy efficiency, attics should be properly sealed, insulated, and ventilated.
What to Look For
- Insulation is rated by its R-value. “R” stands for resistance and the higher the R-value, the more efficiently it resists the transfer of heat from one area to another. RSI-value is the metric variant, while R-value is based on imperial measurement.
- Different types of insulation have different R-values, but you can combine them to achieve a higher overall rating.
- The most common types of insulation used in attics are spray foam, loose-fill, and batt/blanket insulation.
Things to Consider
- Ensure your project meets the minimum R-value needed to receive available rebates.
- Hire a professional. Improper installation can lower the R-value of the material, and compromise health and safety.
Cost : $1.50 to $3.50/ft2
Basement Insulation
Basements can account for about 20% of a home’s total heat loss. Adding insulation to your basement is important, whether it will be finished or not. For optimal energy efficiency, your home should be properly insulated from top to bottom to create a continuous thermal barrier.
Much like your attic, basements need to be sealed, insulated, and ventilated. Proper insulation not only reduces heating and cooling costs but also improves comfort. The materials used to insulate your basement will depend on your foundation and whether you’re insulating on the inside or outside of your home.
What to Look For
- Insulation is rated by its R-value. “R” is the resistance and the higher an insulation’s R-value, the more efficiently it resists the transfer of heat from one side to the other. RSI-value is the metric variant, while R-value is based on imperial measurement.
- The bare minimum the basement should have is R-12, for 100% of the space.
Things to Consider
- Before planning your renovation, assess your basement; determine if interior or exterior insulation is better for your situation. Check for water leaks and dampness.
- Do not insulate the interior of a basement with water leaks or moisture problems.
- Ensure your project meets the minimum R-value needed to receive your desired rebates.
Cost : $6,500 to $18,000
Wall Insulation
Walls can account for up to 20% of heat loss in your home. Insulation is designed to prevent heat from transferring from one area to another, with the added benefit of dampening the transmission of sound. It works by using pockets of air which slow the movement of radiation and vibrations. The type of insulation that works best depends on the type of walls (i.e., concrete block or wood frame) in your home.
What to Look For
- Insulation is rated by its R-value. “R” is the thermal resistance and the higher an insulation’s R-value, the more efficiently it resists the transfer of heat from one area to another. RSI-value is the metric variant, while R-value is based on imperial measurement.
- Different types of insulation have different R-values. You can use more than one type to achieve a higher overall R-value rating.
- You can install one or more of the following: blown-in, rigid board, batt/blanket and spray foam insulation.
Things to Consider
- Mould growth, and cold floors and walls in the winter are signs of a poorly insulated home.
- Ensure your project meets the minimum R-value required to be eligible for rebates.
- Hire a professional. Improper installation can lower the R-value of the material and cause concerns for health and safety, as well.
Cost : $150 to $3,000, plus installation.
Cool Roof
Cool roofs reflect the sun’s rays and reduce heat build-up through a light-coloured or highly reflective roofing product such as a coating, new membrane, or shingle.
Most roofs in Canada are dark in colour and absorb heat from the sun’s rays, transferring it into attics and rooms below. Because cool roofs are better at reflecting the sun’s energy, less heat is transferred to your home. As a result, your heat pump or air conditioner has an easier job keeping your home cool, saving energy, shrinking electricity bills, and reducing greenhouse gas emissions. Cool roofs also increase the life expectancy of your roof, because they reflect the heat and UV rays that damage and age roofing materials.
Dark-coloured roofs in high-density areas also contribute to the urban heat island effect by reradiating absorbed heat back into the air, like the heat radiating off a sun-baked sidewalk on a hot day. As a result of climate change, Canada is expected to see dramatic increases in the number of days with heat advisories. Installing a cool roof is one way to help offset this and increasing incidences of heat-related illness.
There are cool roof options for all types of roofs, including steep-slope (pitched roofs), and low-slope (flat roofs). Roofing products are tested for their reflectivity and given a Solar Reflective Index (SRI) value between 0-100. The higher the number, the more reflective it is.
If you want to convert an existing roof into a cool roof, you have the following options:
- Retrofit your existing roof – apply a coating that is waterproof and has reflective properties
- Replace your existing roof – install a new cool roof using a reflective roof product.
What to Look For
- Low slope or flat roof – look for cool roof products with an SRI value of 78 or greater. Options include single-ply membranes, stone white calcite gravel, fluid applied membranes or a coating of white reflective paint.
- Steep slope or pitched roof – look for cool roof products with an SRI value of 25 or greater. Options include asphalt shingles, metal, tile, and shake, among others.
- Products with a thermal emittance or emissivity of greater than or equal to 0.9
- Products that emit zero volatile organic compounds (VOCs), ozone-depleting substances, and are asbestos- and mercury-free.
- You can search for cool roof products using the Cool Roof Rating Council’s directory.
Things to Consider
- Switch to a cool roof when your roof needs replacement, as converting a standard roof that is in good condition to a cool roof isn’t cost-effective.
- If your roof is not ready to be fully replaced, consider applying a cool roof coating.
- Like all roofs, the condition of your cool roof must be assessed each year and cleaned (if required) to maintain its high reflectivity.
Cost : $6 to $22/ft2
Windows
Heat gained or lost through inefficient windows can increase the energy used to heat and cool your home by 25-30%.
Energy-efficient windows have:
- special coatings (known as low emissivity coatings, or “low-E glass”) and insulated frames and sashes which will reduce heat loss and thus condensation from forming on the window unit.
- more glazing (panes of glass) for better exterior noise reduction and even more energy savings.
- special inert gases between the glass panes rather than just air for better insulation.
- a label on the product to indicate where the model is certified for use in Canada.
What to Look For
- A low U-value. The U-value is a measure of the window’s insulation value. Look for windows in the range of 0.25 to 1.25, with 0.25 being the best.
- Buy windows certified for installation in Canada. In Canada, all windows should be at least double-glazed, that is: having two panes of glass.
- Windows with more glazing (panes of glass), dense gas fills (like argon), and low-E coatings are the most efficient.
- Hinged windows (casements, awnings, hoppers, tilt-turns) are more air-tight than sliding windows.
Things to Consider
- Purchase certified ENERGY STAR® windows.
- Windows that don’t open are more energy-efficient, but floors with bedrooms require at least one window that opens for emergency egress.
- The window frame affects a window’s insulation value, strength, maintenance, and longevity. Wood and fibreglass frames are the most efficient.
- Hire trained installers to ensure your windows and skylights will perform their best.
- Window and supplier warranties vary. Compare before you purchase.
- Consider installing high insulation value windows on the east and north sides of your house to reduce heat loss, and low solar heat gain windows on the west and south sides if you have issues with overheating.
Cost : $500 to $1,000 per window, plus installation.
Source: Natural Resources Canada